

How To Connect A Camera To A Computer
Connecting the photographic camera to the calculator
For the Remote shooting, stabilize the camera with a tripod or using some other method, and so connect the camera to the computer.
The connection and setting methods vary depending on the model.
- ILCE-1
- ILCE-7SM3, ILME-FX3
- ILCE-9M2/7RM4A/7RM4/7C
- ILCE-7M4
- ZV-E10
- ZV-1
- When using another camera
When using the ILCE-1
You tin connect the camera via USB using a USB cable, wired LAN connectedness, or wireless Due west-Fi connection.
-
On the camera, perform the post-obit setting.
-
On the camera, select [PC Remote Cnct Method] from the following options.
[USB]
Connect the camera and computer using the supplied USB cable.

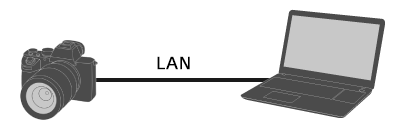
[Wired LAN]
Connect the camera and computer using a general LAN cablevision sold in the market. Afterward connecting, perform pairing of the photographic camera with the figurer.
- Connect the photographic camera and reckoner or switching hub using a LAN cable.
- Select [PC Remote Function] → [Pairing] to perform pairing of the camera with the Remote application.
On the camera, gear up [Connect without Pairing] to [Enable] to connect without pairing.
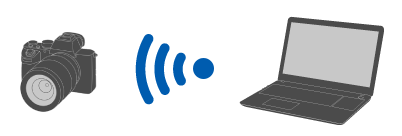
[Wi-Fi Direct]
Connect the camera and calculator using Wi-Fi without passing through an access point.
- Select [PC Remote Function] → [Wi-Fi Straight Info.] to display an SSID and countersign of the camera.
- Perform a Wi-Fi connection to the camera from the computer using the displayed SSID and countersign.
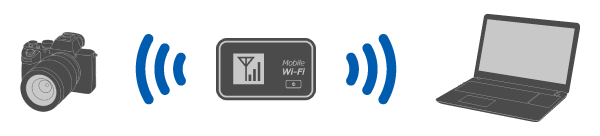
[Wi-Fi Access Bespeak]
Connect the camera and computer using Wi-Fi via an admission bespeak. Information technology is necessary to perform pairing of the camera and computer.
- Select
 (Network) → [Wi-Fi] → [WPS Push] or [Access Point Ready.] to connect the camera and computer to the same admission point.
 - Select [PC Remote Part] → [Pairing] to perform pairing of the camera with the Remote application.
On the photographic camera, set [Connect without Pairing] to [Enable] to connect without pairing.
-
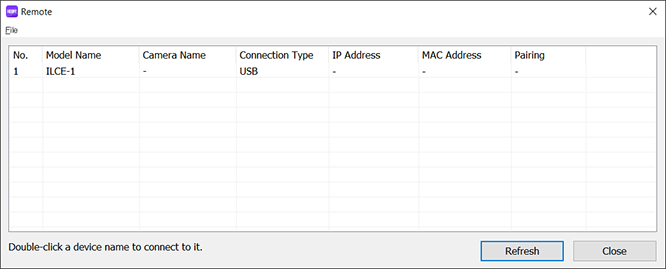
On the computer, launch Remote .
-
In the Device selection window, select a camera to use for Remote Shooting by double clicking.
When using the ILCE-7SM3, ILME-FX3
You lot can connect the camera via USB using a USB cable or via a wireless Wi-Fi connection.
-
On the camera, perform the post-obit setting.
-
On the camera, select [PC Remote Cnct Method] from the following options.
[USB]
Connect the camera and figurer using the supplied USB cable.
[Wi-Fi Direct]
Connect the camera and estimator using Wi-Fi without passing through an access betoken.
- Select [PC Remote Function] → [Wi-Fi Directly Info.] to display an SSID and password of the photographic camera.
- Perform a Wi-Fi connection to the camera from the computer using the displayed SSID and countersign.
[Wi-Fi Admission Signal]
Connect the camera and computer using Wi-Fi via an access point. Information technology is necessary to perform pairing of the photographic camera and reckoner.
- Select (Network) → [Wi-Fi] → [WPS Push] or [Access Point Gear up.] to connect the camera and estimator to the same access point.
- Select [PC Remote Function] → [Pairing] to perform pairing of the camera with the Remote application.
-
On the computer, launch Remote .
-
In the Device pick window, select a camera to utilise for Remote Shooting past double clicking.
When using the ILCE-9M2/7RM4A/7RM4/7C
You lot can connect the camera via USB using a USB cable, wired LAN connexion*, or wireless W-Fi connection.
* Supported devices: ILCE-9M2
-
On the camera, perform the post-obit setting.
-
On the camera, select [PC Remote Cnct Method] from the following options.
[USB]
Connect the photographic camera and computer using the supplied USB cable.
[Wired LAN] (ILCE-9M2 simply)
Connect the camera and computer using a full general LAN cable sold in the market. Later connecting, perform pairing of the camera with the computer.
- Connect the photographic camera and computer or switching hub using a LAN cable.
- Select [PC Remote Function] → [Pairing] to perform pairing of the camera with the Remote application.
If [Connect without Pairing] is available on the camera, prepare it to [Enable] to connect without pairing.
[Wi-Fi Direct]
Connect the camera and computer using Wi-Fi without passing through an access indicate.
- Select [PC Remote Function] → [Wi-Fi Direct Info.] to display an SSID and password of the camera.
- Perform a Wi-Fi connection to the photographic camera from the computer using the displayed SSID and password.
[Wi-Fi Access Point]
Connect the camera and computer using Wi-Fi via an access signal. It is necessary to perform pairing of the camera and computer.
- Select (Network) → [Wi-Fi Settings] → [WPS Push] or [Access Bespeak Set.] to connect the camera and computer to the same access indicate.
- Select [PC Remote Function] → [Pairing] to perform pairing of the camera with the Remote application.
If [Connect without Pairing] is available on the camera, set information technology to [Enable] to connect without pairing.
-
On the reckoner, launch Remote .
-
In the Device selection window, select a photographic camera to apply for Remote Shooting by double clicking.
When using the ILCE-7M4
You lot can connect the photographic camera via USB using a USB cable or via a wireless Wi-Fi connectedness.
Brand sure that the camera is not connected to a smartphone beforehand.
-
On the camera, perform the following setting.
- Carte du jour → (Network) →[Transfer/Remote]→[PC Remote Office]→[PC Remote]→[On]
- Carte du jour →
-
On the camera, select [PC Remote Cnct Method] from the following options.
[USB]
Connect the camera and figurer using the supplied USB cable.
[Wi-Fi Direct]
Connect the camera and computer using Wi-Fi without passing through an access point.
- Select [PC Remote Office] → [Wi-Fi Straight Info.] to display an SSID and password of the camera.
- Perform a Wi-Fi connection to the photographic camera from the computer using the displayed SSID and password.
[Wi-Fi Admission Point]
Connect the camera and computer using Wi-Fi via an access point. It is necessary to perform pairing of the camera and computer.
- Select (Network) → [Wi-Fi] → [WPS Push button] or [Access Indicate Gear up.] to connect the camera and figurer to the same access bespeak.
- Select [PC Remote Role] → [Pairing] to perform pairing of the camera with the Remote application.
-
On the estimator, launch Remote .
-
In the Device option window, select a camera to use for Remote Shooting by double clicking.
When using the ZV-E10
Y'all can connect the camera via USB using a USB cable or via a wireless Wi-Fi connection.
-
On the camera, perform the post-obit setting.
-
On the camera, select [PC Remote Cnct Method] from the following options.
[USB]
Connect the photographic camera and reckoner using the supplied USB cablevision.
[Wi-Fi Direct]
Connect the photographic camera and computer using Wi-Fi without passing through an access point.
- Select [PC Remote Role] → [Wi-Fi Straight Info.] to brandish an SSID and password of the camera.
- Perform a Wi-Fi connexion to the photographic camera from the computer using the displayed SSID and countersign.
[Wi-Fi Access Bespeak]
Connect the camera and calculator using Wi-Fi via an admission betoken. It is necessary to perform pairing of the photographic camera and figurer.
- Select (Network) → [Wi-Fi Settings] → [WPS Button] or [Access Point Ready.] to connect the camera and computer to the same admission betoken.
- Select [PC Remote Part] → [Pairing] to perform pairing of the camera with the Remote application.
-
On the reckoner, launch Remote .
-
In the Device choice window, select a photographic camera to use for Remote Shooting by double clicking.
When using the ZV-i
You can connect the camera via USB connection using a USB cable.
-
Use the Carte du jour on the camera to perform the following setting.
-
Connect the camera to the estimator using a USB cable.
" Connecting... " will appear on the monitor of the camera.
-
On the computer, launch Remote .
-
In the Device pick window, select a camera to utilize for Remote Shooting by double clicking.
When using another camera
Yous tin can connect the photographic camera via USB connexion using a USB cable.
* The displayed terms may differ depending on the photographic camera.
-
Utilise the MENU on the camera to perform the following setting.
-
Connect the camera to the calculator using a USB cablevision.
" Connecting... " will appear on the monitor of the camera.
-
On the computer, launch Remote .
-
In the Device choice window, select a camera to utilize for Remote Shooting past double clicking.
Was this article helpful?
We are holding a simple survey to further improve our services. If you could reply the survey, it would be much appreciated.
Your responses will be used to further develop and improve our products/services. The survey responses will be processed statistically and volition not be disclosed in a style in which an private can be distinguished.

Source: https://support.d-imaging.sony.co.jp/app/imagingedge/en/instruction/4_1_connection.php
Posted by: ballardloortambel1953.blogspot.com
0 Response to "How To Connect A Camera To A Computer"
Post a Comment