

Oil Paint Effect In Photoshop Cc
Get a cool oil painting effect in Photoshop CS6

One popular technique that most of us try at some stage is applying a painted effect to an image. For some time now, there has been a Photoshop CS4 and CS5 extension called Pixel Bender which included an Oil Paint filter.
This filter has now found a permanent home in the Photoshop CS6 filter line-up making it easier to use than in earlier versions of Photoshop. Here we'll show you how to prepare our sample image to use with the Oil Paint filter and then how to apply the filter. If you are using your own photo, start with a small image as the filter works best when not overstretched.
Click here to download your start image
01. Prep your image

Open the start image. Set Method to Local Adaptation, set Shadow 10%, Highlight 20%, Vibrance 30% and Saturation 50%. Adjust Gamma to 1.15, Exposure to -0.05 and Detail to 60%. Drag a shallow S-shape in the Toning Curve and Histogram. Click OK.
02. Apply the Filter
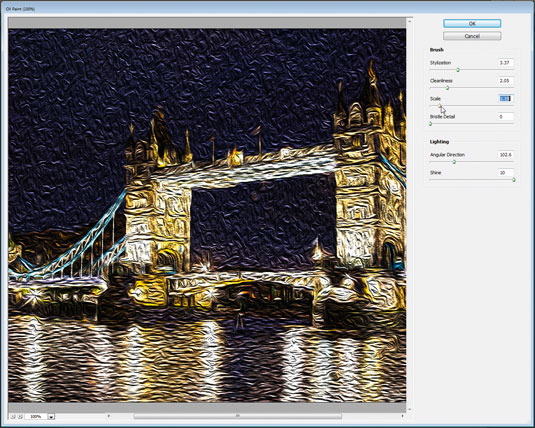
Choose Filter>Oil Paint. Adjust Stylization from harsh on left to flowing to the right. Use Cleanliness to change brush detail from detailed strokes on left to smooth on right. Use Scale to adjust size of brush strokes and drag Bristle Detail to vary from smooth on right to detailed granular brush strokes on left.
03. Adjust the lighting
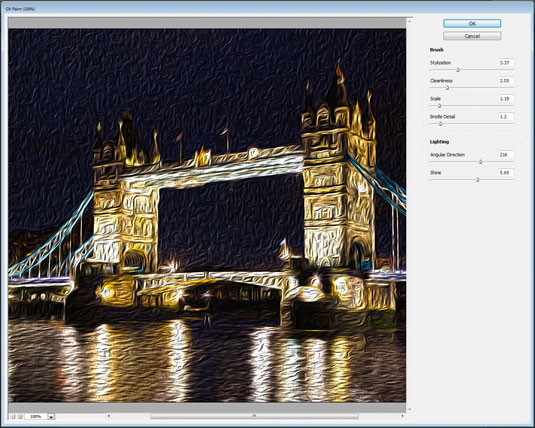
The last two sliders control the light on the brush strokes themselves. They will be more apparent if you have highly visible brush strokes. Angular Direction controls the angle at which light falls on the brush strokes and Shine adjusts the contrast of the brush strokes themselves - it ranges from low contrast on the left to high contrast on the right.
04. Duplicate our image
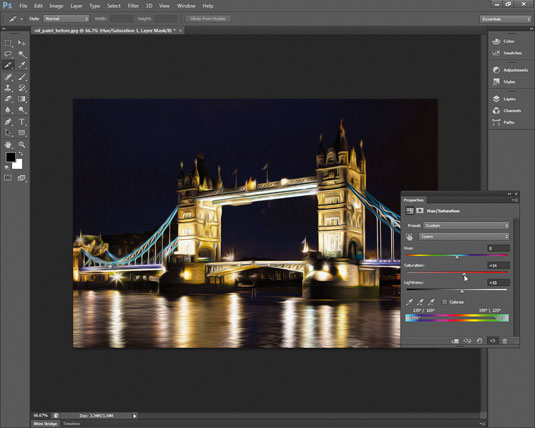
To finish, we set Stylization to 3.5, Cleanliness 4.5, Scale 0.75, Bristle Detail 3, Angular Direction 85 and Shine 0.55. Click OK and then choose Layer>New Adjustment Layer>Hue/Saturation and add some more saturation to the image.
We set Master channel Saturation to 20, Cyans Saturation to 14 and Lightness to 10, and Yellows to Saturation -10.
Get Practical Photoshop Magazine!
This tutorial first appeared in Practical Photoshop magazine, the number one magazine for lovers of photography and image-editing. Whether you're looking for digital darkroom tips, or want to get creative, you should definitely check it out!
Now check out our massive list of 101 Photoshop tutorials !
Related articles
Oil Paint Effect In Photoshop Cc
Source: https://www.creativebloq.com/photo-editing/get-cool-oil-painting-effect-912813
Posted by: ballardloortambel1953.blogspot.com
0 Response to "Oil Paint Effect In Photoshop Cc"
Post a Comment