

How To Remove Rear Camera On Ford Edge 2012
The photographic camera on our 2011 Edge SEL had been frequently flipping upside downwardly or going black and displaying "Contact Dealership," which according to TSB11-06-04 warrants a replacement of the backup camera. The dealership told me that they always replace the trim piece that the camera is mounted to since it is nearly incommunicable to not break the tabs, resulting in a $700+ bill. I could not find a guide online for the replacement of this photographic camera, so I decided to have a couple of pictures and certificate what I did to replace information technology for my starting time post on this forum. It isn't exactly straightforward, merely if you are careful you can practise it yourself with just a few hand tools.
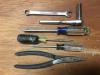
Tools needed:
7/sixteen" open finish wrench
seven/16" socket
#2 Phillips screwdriver
T20 Torx screwdriver
Thin mutual screwdriver for prying
Needle nose pliers for pinching plastic rivets
Overview:
To get to the camera, you must remove the plastic console on the within of the dorsum hatch. This allows admission to the nuts to remove the exterior trim piece the photographic camera is mounted to. Once removed, yous must separate the trim piece to become to the camera.
Pace 1:
Remove four Phillips caput screws from the underside of the interior hatch plastic panel.
Footstep two:
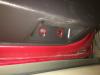
On the left and right side of that panel, carefully pry the panel away from the hatch to expose the plastic rivets circled in carmine (picture is of the removed console). A thin blade screwdriver or a panel removal tool will help these release without breaking. Removing the minor panel in the carmine rectangle will allow y'all to become more calorie-free on the situation. Once you release the circled ones, the rest popular free with a gentle tug. Gear up panel aside.
Step 3:
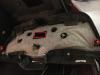
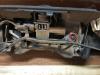
Unclip the ii plugs in the xanthous rectangles. Remove the 6 nuts in the admission holes indicated by the black circles. In the black rectangles (ane offscreen to the right indicated past arrow), pinch the wings of the plastic rivets with needle nose pliers to allow them to slip through their holes. Exterior trim panel should now be loose. Close the hatch, remove the panel forth with the wire harness. This volition crave you to remove the rubber plug forth with it.
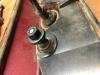
Stride four:
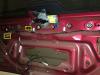
Take the trim panel over to a piece of work area. At that place will be half-dozen studs protruding from the dorsum of the trim panel. The two to the far left and two to the far correct must be removed to separate the painted slice from the unpainted piece. To remove these, take 2 of the basics removed in the previous step and thread them on to a stud dorsum to dorsum. Using the open stop wrench and socket, tighten them against each other. Once tight, y'all volition be able to use the open up end wrench to turn the lower nut counterclockwise to remove the stud. Once removed, use the socket and wrench to remove the nuts, and then move on to the adjacent stud.
Step 5:
This is the frail stride that prompts dealers to supercede the whole trim console. On the underside of the trim panel are thin rectangular slots that you lot can fit a thin-bladed screwdriver in. Insert it equally shown in the film, and advisedly pry up as you gently try to separate the clip from the slot. Do this for each prune along the lesser. There is one additional clip in the center with no admission slot, you just take to get inventive and pry information technology whatever way you run across fit.

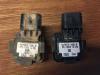
Step half-dozen:
Remove the screw circled in cerise and remove the plastic retainer it was securing. The camera will now come complimentary. Unplug and supersede with new camera.
Footstep 7:
Reverse all of the above steps. Employ the double nut trick to reinstall the studs. Yous will likely need some other person to help you reinstall the interior hatch panel because you have to become all of the plastic rivets lined up to pop it into place.
Hope this helps someone else! If anything was not articulate, please let me know. Thanks!
Source: https://www.fordedgeforum.com/topic/19747-backup-camera-replacement/
Posted by: ballardloortambel1953.blogspot.com
0 Response to "How To Remove Rear Camera On Ford Edge 2012"
Post a Comment